The Connection, Inc Blog
The Connection, Inc has been serving the New Jersey area since 1992, providing IT Support such as technical helpdesk support, computer support and consulting to small and medium-sized businesses.

The advantage of Facebook is also its disadvantage: the fact that you’ve likely got a large variety of people on your friends list. While this works out great for networking, it may mean holding back on posting a personal opinion if it isolates or offends someone you’re friends with. To get around this social dilemma, Facebook allows you to hide your status from one or more friends. Here’s how to do it.
To get started, create a post like you normally would by opening a new status update. Type whatever it is you want to post and then click on the privacy control button, located on the bottom right side of your status window. This will cause a drop down menu to appear.
By default, your privacy setting will be set to Friends (unless you’ve previously changed it). Scroll down and select Custom. This will open a new popup window for Custom Privacy.
From here, go to the section titled Don’t share with and select the form. Next, enter the name of the person you wish to exclude from seeing your post. If there is more than one person that you wish not to see your post, then go ahead and enter their name(s) too. Additionally, if you happened to have your friends already organized into lists, like family, coworkers, etc., then you can enter the entire lists into the form and exclude everyone on the list from seeing your post.
Upon completing this form, select Save Changes. You’ll next be taken back to the Update Status window. You can now say whatever it is you want to say and select Post without having to worry about someone taking it the wrong way!
Now technically, the only way the person you excluded would be able to see your post is if you went back and changed the privacy settings to include them, or if you edited the post by tagging their name. However, after going through all of this trouble to exclude them, you probably don’t want to do that--unless you’ve had a change of heart.
Depending on your social sensitivities, this little trick may make using Facebook a completely different experience for you. Or, from a business perspective, it can be a way for you to share your true thoughts about a product or service, without having your friends associated with said product or service find out what you posted.
Of course, all of this is for nothing if your social media post gets relayed in real life to the person you intended to exclude, which is why you’ll want to be mindful of your mutual friends, and perhaps exclude them too.
Are you one to hold back what you really think on social media because you don’t want to offend any of your friends? If so, is this tip a game-changer for how you use Facebook? Share your thoughts in the comments.
0 Comments

When you’re trying to keep your accounts secured, one of the best strategies is to employ a two-factor authentication strategy wherever possible. You’ve probably utilized it before, without even realizing it.
Your workstation is equipped with all of your necessary software solutions, but sometimes it can be challenging to find a specific app. If you want to see a list of all applications on your device, Windows 10 makes it easy. The key to doing so lies in the Start menu.
Now that the Start menu is back in Windows 10, you have plenty of opportunities to search for not just your applications, but basically anything--all thanks to Cortana integration. You have all sorts of ways to better search your PC for important things. We’ll discuss how you can use the Start menu to find your apps both quickly and efficiently.
First, you can use the Search bar to find a specific program. This is by far the easiest way you can do so, but sometimes you may not know how to spell it.
You can also look at the complete list of programs on your PC easily enough. To do this, click on the Start menu and check out the right column. This will show you a list of your most used apps at the top, but the bottom will show you an alphabetical list of all programs on your computer. If you click on one of the letters in the headings, you’ll be shown an even simpler way of viewing your apps.
When you click the letters, you’ll be shown a list of all of the letters of the alphabet, which can further narrow down what you’re looking for. By clicking on a specific letter, you’ll be shown all applications that begin with that letter. If you don’t know what a program is called, but you still don’t know the exact name, searching this way a good way to find it.
Windows 10 is one of the best ways that you can improve the way your organization functions. It provides both a solid user experience and a much-needed technological update for organizations that have yet to upgrade.
If you want to take full advantage of Windows 10, The Connection can help. We’ll work with your business to ensure that you get the technology solutions you need, and to make sure that your apps are compatible with the new operating system. To learn more, reach out to us at (732) 291-5938.
What happens when you lock your Windows 10 PC? Unless you’ve changed your lock screen settings, you’re greeted with a dynamic background image that changes every day or so. Sometimes, Windows will show you an image that’s so good that you’ll want to download it so you can look at it more. But how does one go about this? For this week’s tip, we’ll show you how!
Unlike previous versions of Windows where lock screen images are pulled from a local folder with a few ho-hum stock photos in it, Windows 10 gets its lock screen images from a built-in feature called Windows Spotlight.
Unfortunately, due to the way that Windows Spotlight is set up, downloading an image from Spotlight isn’t as easy as opening a folder and dragging and dropping what you like. However, despite the fact Windows Spotlight isn’t very user friendly, navigating the feature to locate and download the photo you want is possible.
To get started, open Windows Explorer and click on the View tab (located to the right of Computer). Next, be sure to check both boxes for File name extensions and Hidden items.

Now you’ll copy and paste the file directory provided below into the Windows Explorer file path.
C:\Users\username\AppData\Local\Packages\Microsoft.Windows.ContentDeliveryManager_cw5n1h2txyewy\LocalState\Assets
In the file path, replace “username” with your user name and then hit Enter. This will take you to a window populated with files. These are the files that have been utilized by Windows Spotlight.
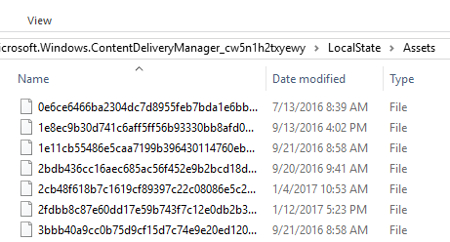
In order to put the photos at the top of this list, select the Size tab.
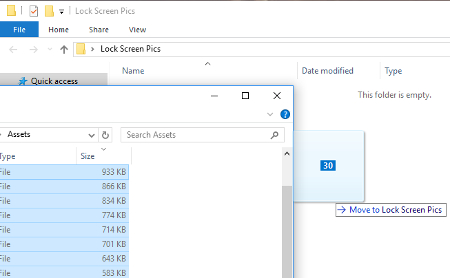
Next, make a new folder somewhere on your drive for you to move these Windows Spotlight images to, like on your Desktop or Pictures, and then open your new folder.
You will now want to move these photos to your new folder so you can sift through them and use them for however you please. Do this by selecting all the files greater in size than 100KB. Perform this task by selecting the file at the top of the list, then, while holding the Shift key, scroll down and select the one file that is greater than 100KB. With 30 or so files selected, you will next copy these files (Ctrl+C), and paste them in your new folder (Ctrl+P).
This move will bring up a prompt by Windows Security.
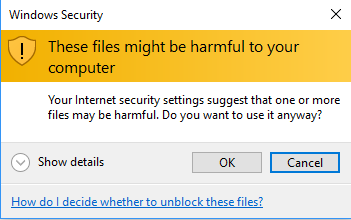
Go ahead and select OK. You don’t have to worry about these files harming your computer, since they’re already on your computer.
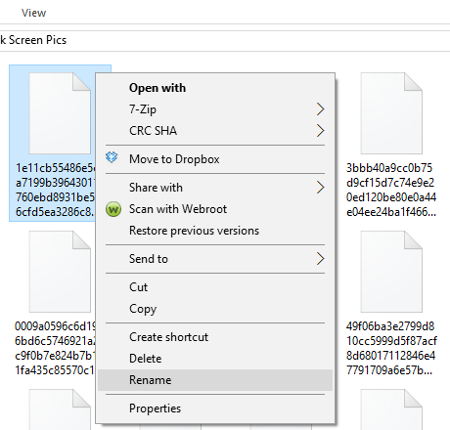
Now, with the files copied in your new folder, you’re going to want to rename each one and add a file extension to them so you can see what they are. Do this by right clicking the file and then selecting Rename.
By renaming the file to something simple like 1.PNG and then selecting Enter, you will see the icon for the file change to that of a photo. Also, go ahead and click View > Large icons if this makes renaming files more manageable for you.
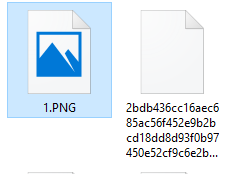
With the file format changed, go ahead and double click the file to open it and reveal the image. With the image revealed, go ahead and name your file accordingly. Also, with the file saved on your PC, you can now access this folder and use these photos for however you fancy; like for your PC’s wallpaper, sharing over social media, memes, or whatever else you can think of.
Admittedly, this is a lot of work to go through in order to locate and isolate a photo that’s caught your eye. Although, when it comes to great art, they say that procuring it is half the fun!
For more great PC tips and tutorials, subscribe to The Connection’s blog.
Have you tried using Microsoft OneNote recently? It’s a great solution for a business setting, as it can provide your organization with plenty of features and capabilities that keep your staff organized and efficient. Thankfully, these features can allow your business to pass OneNote off as a project management tool. We’ll show you how it’s done.
News & Updates
The Connection, Inc. Celebrates 32 Years as a Trusted Technology Provider! Since our founding in 1992, technology and the way we operate and do business has changed a lot. Companies that have adapted and aligned themselves with ...
Understanding IT
Get the Knowledge You Need to Make IT Decisions
Technology is constantly evolving, and keeping up can feel overwhelming. Whether you want to understand cybersecurity threats, explore automation, or learn how regulations like PCI DSS impact your business, we’ve made it easy to access clear, straightforward insights on key IT topics.
Contact Us
Learn more about what The Connection can do for your business.
The Connection
51 Village CT
Hazlet, New Jersey 07730