The Connection, Inc Blog
The Connection, Inc has been serving the New Jersey area since 1992, providing IT Support such as technical helpdesk support, computer support and consulting to small and medium-sized businesses.
Control Your Profile, Part II

In part one of this series we started to go through Facebook privacy failings, but we didn’t really give you any information you can use. For part two, we have decided to take you through some security setting for Facebook.
Facebook has over two billion users, and as a result, it has its fair share of privacy snafus. While they do (finally) make available all of a person’s Facebook information, their strategies to success are important reasons why there are so many privacy concerns throughout the online world.
Making it a priority to know how to take control over your personal information on Facebook is a good place to start. Let’s run through Facebook’s privacy settings, and get you set up with two-factor authentication.
Let’s start from a PC. Head over to facebook.com and log in.
Making Sense of Facebook’s Security and Privacy Options
Once you’re logged in to facebook.com, you’ll want to click the little down arrow on the top right of the page. In that menu click on Settings. This can get a little confusing, so if you ever need to start from the beginning know that using the little down arrow can bring you back.
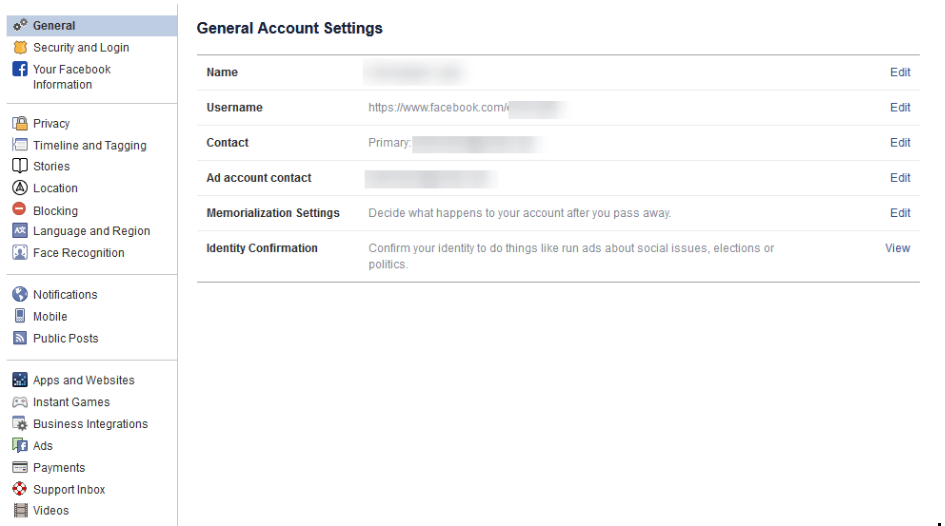
Make Sure the General Account Settings are Right
You will want to verify that you own and control all of the email accounts tied to your Facebook account. If you used an old email address (that you can’t get into), you’ll have a hard time getting back into the account if something were to happen.
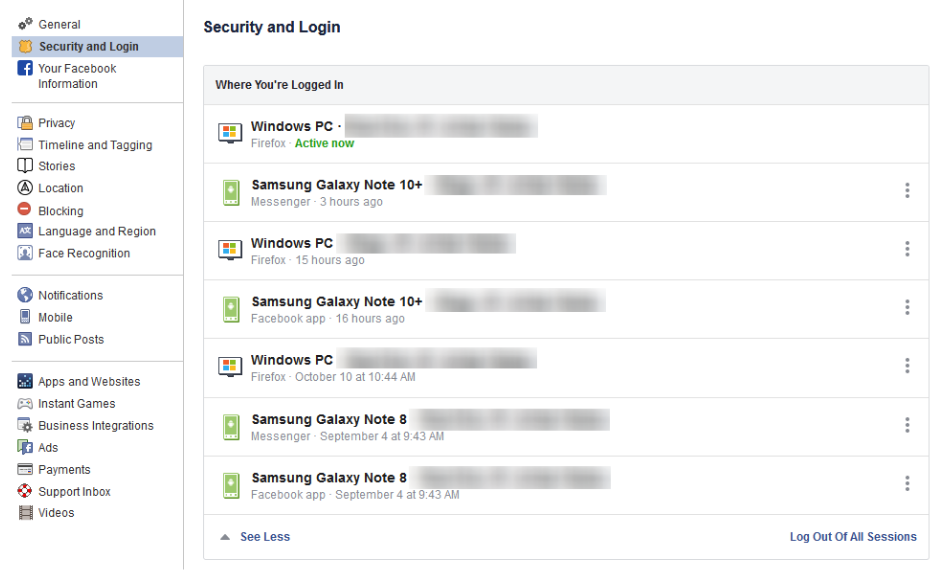
Security and Login - Find Out Where You’ve Logged into Facebook
Click Security and Login on the right.
On this screen, you can see all the devices your Facebook account is currently signed into. You will be confused why there are so many, but think about it: how long have you been using Facebook? For many people it’s not out of line to suggest that they are on their fourth or fifth phone since first using the Facebook app. This means that these devices will show up. You don’t use a Nokia Lumia 920 any longer? Not many people do. Facebook gives you the option to sign out of any of these devices by accessing the three-dot icon next to the device’s name.
It’s a good practice to keep your account logged out on devices you don’t typically use to access Facebook. If you see any suspicious devices among your list of approved devices, you will immediately need to change your password (directions below).
Change Your Password
Changing your password regularly is a good idea, but you definitely don’t want to use the same password over multiple accounts. To do so here, you will want to click on the down arrow on the top right of Facebook, going to Settings, and clicking Security and Login.
How to Enable Two-Factor Authentication
If you haven't heard of two-factor authentication, it is the practice of setting your account up with an additional layer of security. To get started, select Use two-factor authentication and click edit. Click Get Started.
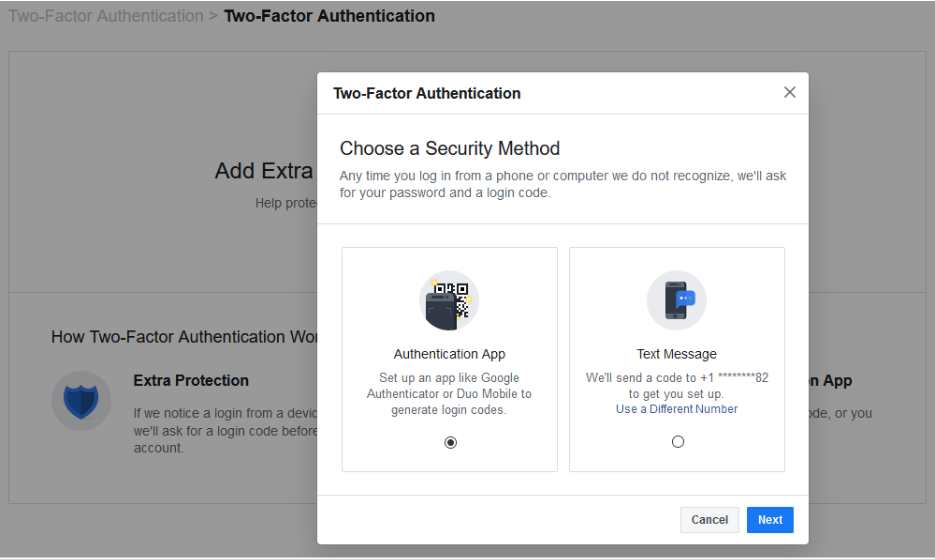
A screen will pop up that gives you two Security Methods. Before choosing an option, you should understand both.
Option 1 - Authentication App - Clicking on this option will allow you to use a third-party app to authenticate your identity. Popular authentication apps include Google Authenticator, Last Pass Authenticator, or Duo Mobile. Using the authentication app option is more secure than option 2, but it does require you to have access to the mobile device that the authenticator app is installed on.
To set this up, open your authentication app on your mobile device. It makes the most sense to use the authenticator app that you use for other accounts, but if you don’t have one, and you have a Google account, use Google Authenticator.
Then, from Facebook on your computer (see the above screenshot), select Authentication App and click Next.
Facebook will present you with a QR code to scan. In your Authenticator App, add a new account (typically there is a + icon to tap) and scan the QR code. Once scanned, the app will generate a six-digit number to use. Facebook will ask for a Confirmation Code. Type in the six-digit number and you’ll be set.
Option 2 - Text Message - Option number two sends a code via text message to your mobile device. Make sure that you enter the correct number. This method may not be as secure as using an authentication app, but for practical purposes it will do.
Select the Text Message option and click Next, Facebook will text you a code. Type that code into Facebook and voila, you are in.
Depending on the option you choose, Facebook will walk you through the next steps to verify and enable two-factor.
Add a Backup Plan
Once you’ve set up your method, Facebook will provide you with an option to Add a Backup. If you chose to set up two-factor with an Authentication App then Facebook will allow you to set Text Message 2FA as a backup, and vice versa. It’s not a bad idea to set up the other method as well, just in case.
Nowadays, a lot of online accounts offer 2FA, but Facebook also lets you have Recovery Codes (Google also does this, so if you have a Google account or use Gmail, it’s a good idea to get all of this set up over there as well).
Back on the Two-Factor Settings page, under the Add a Backup, there is an option for Recovery Codes.
Click Setup, and Facebook will pop up a window telling you about recovery codes and click Get Codes.
At this time, Facebook will provide you with 10 recovery codes. You can use them in an emergency to get back into your account. These codes are just single-use 2FA codes, so you’ll need to know your password and one of these codes to get back into your account. Since these codes can only be used once, you can request 10 new codes at any time by returning to the Two-Factor Settings page. Keep these codes in a safe place to ensure your account isn’t accessed by anyone else.
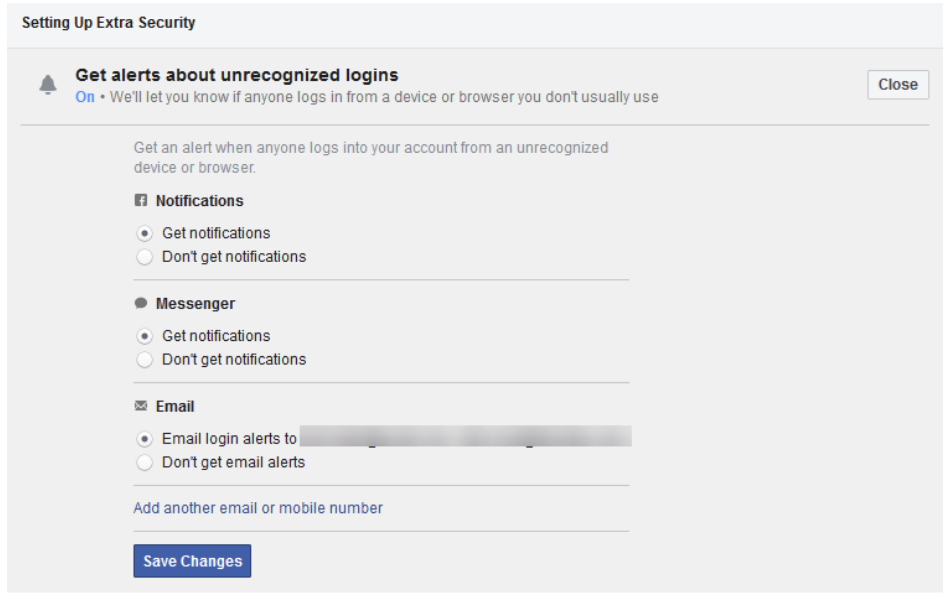
Setting Up Extra Security
If you go back to the Security and Login area of the settings menu, scroll down to Setting Up Extra Security.
This area allows you to set alerts when a new device or browser is used to log into your Facebook. The menu allows you to define additional email addresses. You can also have those notifications sent to you via Facebook Messenger, SMS, or as a Facebook notification.
Below that option, you can choose 3 to 5 Friends to Contact if you get locked out of your Facebook account. If you choose this option, you will want to make sure that you only list people that you trust. If they are like-minded about their own privacy, the better off you will be.
This is admittedly a lot to take in, but setting up two-factor authentication and having control over who can access your Facebook account will go a long way toward securing your Facebook experience. You’ll still be inundated with stupid memes, but at least your personal data will remain secure.
Check back for part three of our Facebook privacy series and leave any thoughts you may have in the comments section below.
About the author
News & Updates
The Connection, Inc. Celebrates 32 Years as a Trusted Technology Provider! Since our founding in 1992, technology and the way we operate and do business has changed a lot. Companies that have adapted and aligned themselves with ...
Understanding IT
Get the Knowledge You Need to Make IT Decisions
Technology is constantly evolving, and keeping up can feel overwhelming. Whether you want to understand cybersecurity threats, explore automation, or learn how regulations like PCI DSS impact your business, we’ve made it easy to access clear, straightforward insights on key IT topics.
Contact Us
Learn more about what The Connection can do for your business.
The Connection
51 Village CT
Hazlet, New Jersey 07730
Comments